Procreate Cheats (That Aren’t Really Cheating)
After spending way too many hours in Procreate (and somehow still forgetting where certain features hide), I started keeping track of the little things that really made my workflow smoother.
Here’s a growing list of my favorite small but mighty functions and habits that made working in Procreate more efficient and enjoyable to me.
Pining Favorite Brushes 🖌️
In the Recent folder at the top of your brush list, swipe left and tap Pin. Now they’ll always stay put, no matter how many brushes you cycle through.
If it gets too messy, you can also create new sets and gather copies of your favorite brushes.
Recolor with Hue / Saturation 🖍️
Whether I just colored my line-art or I’m mid-texturing, sometimes the colors just don’t work or I have a change of heart. I used to drag and drop new colors onto layers, but that takes forever especially when I missed a spot or didn’t find the right color at first try.
Now, I often use Action > Adjustments > Hue, Sat, Brightness instead. It’s way faster, gives me instant previews, and sometimes leads to colors I wouldn’t have considered (looking at you, day 20 👀).
Masks Instead of Erasing 🥷
I get separation anxiety when it comes to erasing, so I use Layer Masks instead.
Now I just color anything I want to erase black. If I change my mind, I can bring things back instead of regretting a deleted detail while I’m figuring out what I’m actually doing. Just make sure you hit the mask not the actual layer.
Private Images 🚨
When I don’t want images like guidelines or my mood board to show up in time-laps videos, I place them into my file as a Private Image.
For that, go to Actions > Add and swipe left on Insert a photo. In the layer panel private images are labeled as such.
Saving Brush Sizes 🔒
When redoing or continuing an existing stroke, using the same brush size is key (especially with monoline brushes). Luckily in Procreate individual brushes sizes can be saved.
Simply tap on the size slider and hit the + sign in the preview window. Now a “bookmark” is added for this particular brush. This also works for the opacity slider and you can undo the save by tapping the minus sign if your slider gets too crowded.
Symmetry Guide Color & Position 📐
Go to Canvas > Edit Drawing Guide, use the bar at top of your screen to change colors (super helpful mid-project when colors are changing) AND you can drag your symmetry guides wherever you need them to be.
This comes in handy whenever I want to draw a symmetric letter or elements that are not placed in the center of my canvas. (I should start reading handbooks…)
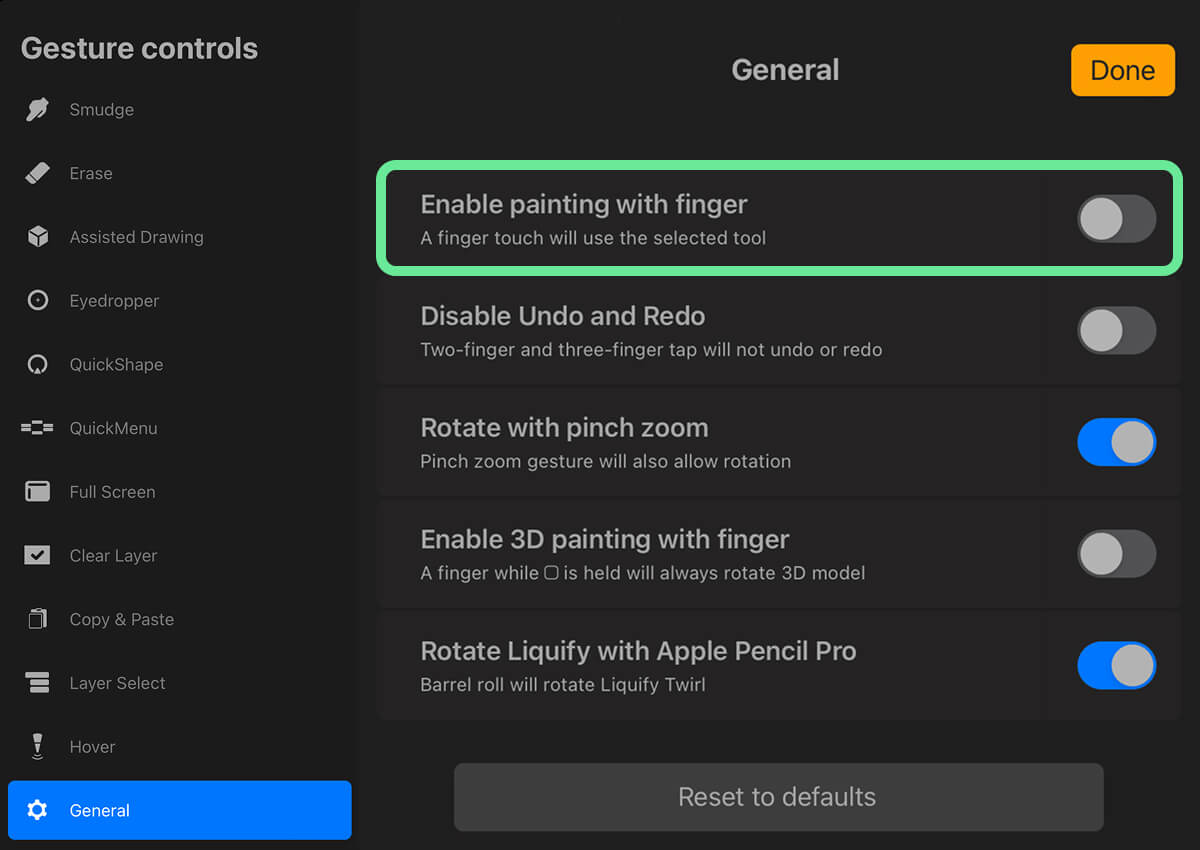
No More Accidental Strokes ✋
Ever zoomed in and suddenly placed a random stroke across your artwork? Same 🥲
Going to Prefs > Gesture Controls > General and 👉DISABLE👈 the function “Enable painting with finger” lets me use fingers for gestures only. So no more unwanted strokes when I’m just trying to navigate my canvas!